Showing posts with label Kitchen DIY. Show all posts

Saturday, 9 March 2013

My Kitchen Dresser

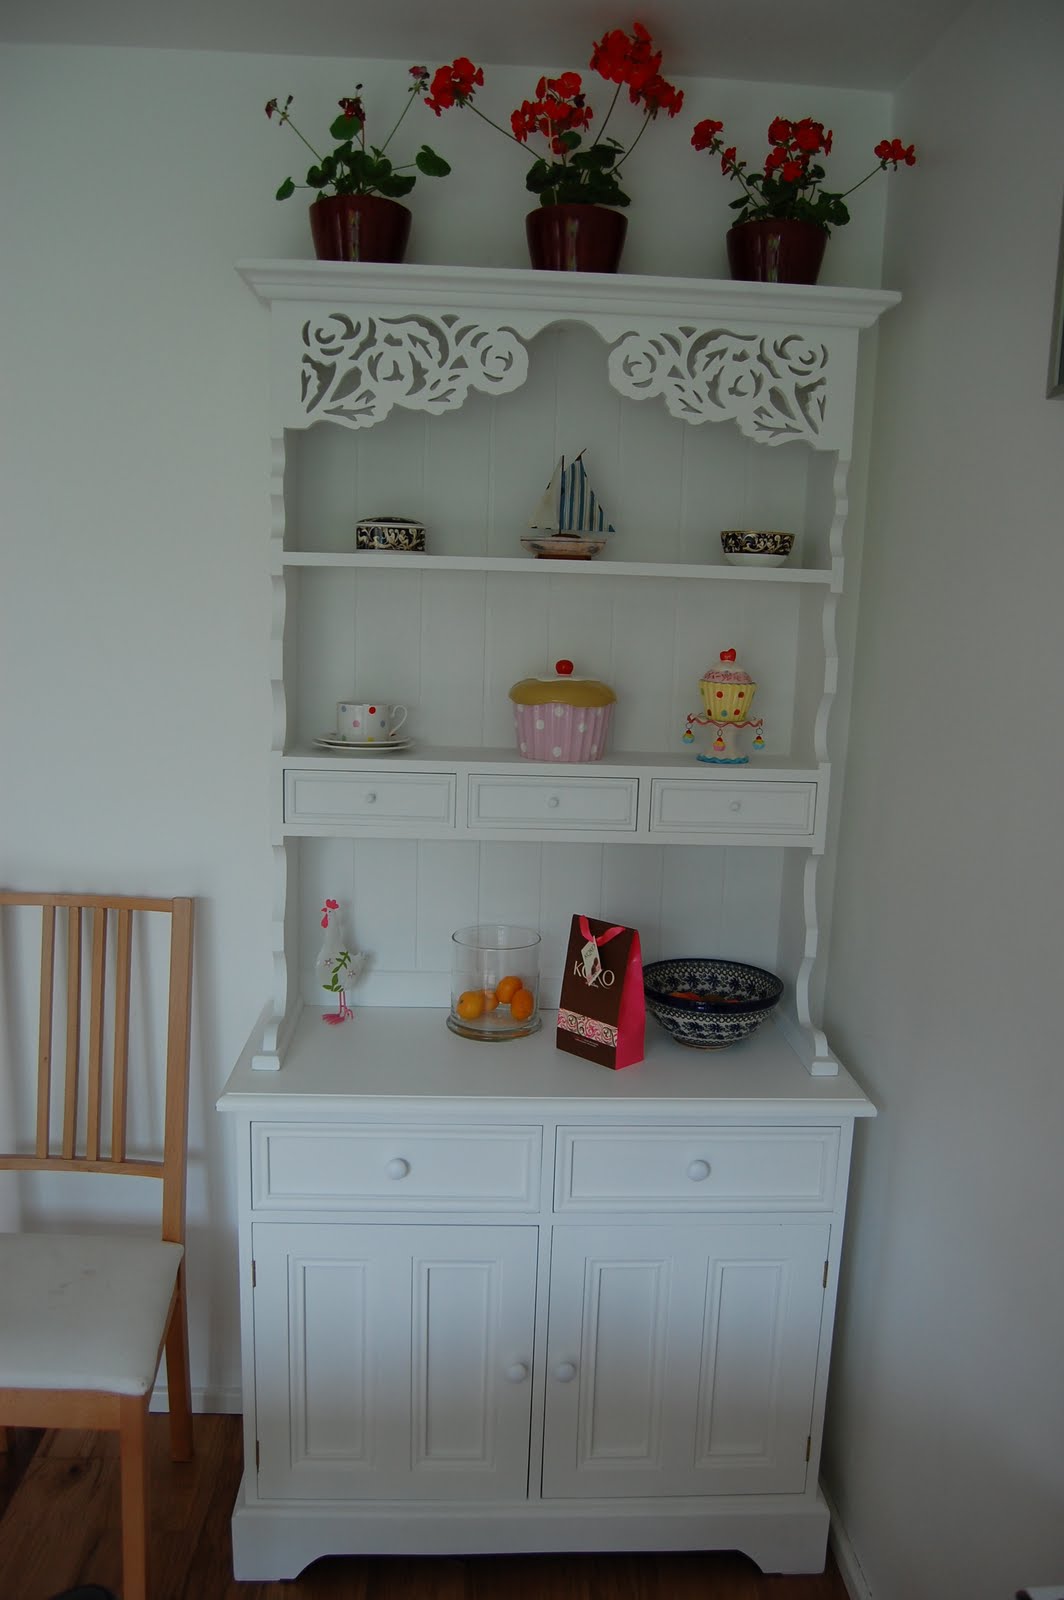
I was sat drinking a cup of tea in the kitchen today thinking about the next job I needed to do when it occurred to me that I have not really featured my little white dresser on this blog.
When we re-decorated the kitchen nearly three years ago (where has the time gone) I had said that I would really like some form of dresser.  Our kitchen does not have much wall space so behind the kitchen door was the only place available.
After much hunting, which took months, I finally found a narrow white dresser that fits perfectly in the space between the kitchen door and the adjacent wall.
Over the time that I have had the dresser I have gradually added and displayed various keepsakes such as items that Sophie has made or colourful cute items.
So the above rose is the latest addition.
Sophie spotted it first in Asda and it really is the smallest rose plant that I have ever seen.
Of course we could not leave.........
....the other one behind.  I will need to re-pot them so that they keep growing, but for now they have...
pride of place on the dresser.
What else is there?
I love blue and white so the mug is a Whittards purchase years ago.  The owl was a gift Sophie received at  Christmas.  The Russian doll I made in January from a kit.
This is a small ornament that we brought back from our cruise when we visited Amsterdam.  So cute.
A purchase during my cupcake obsession.
Cath Kidston set which was a 40th present from my sister.
A recently made felt heart.
There are other items and they all have a story or some significance.  They get rotated round and added to, moved to the living room and then moved back.
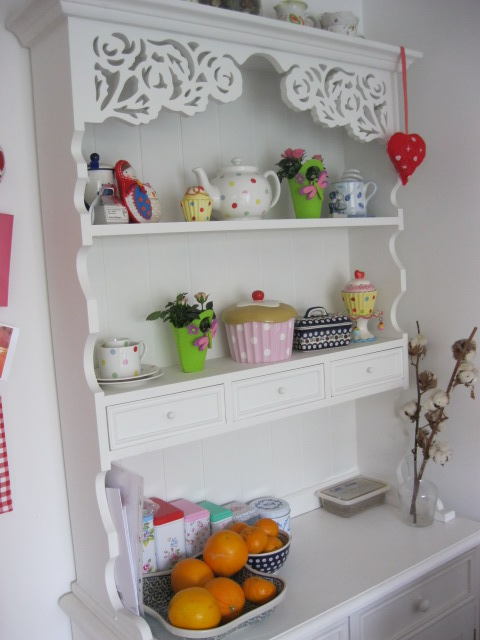
Overall, I love my little dresser and despite its small size it is very much a focus in our kitchen.
Do you have a dresser, display shelf or favourite corner in your home?
Has been a lovely day here in Cornwall and a pain free day for my hip.......
Hip Hip  (hooray) thank goodness.
Take care
xx

Friday, 11 June 2010

Kitchen addition.......

To finish off our kitchen we have been looking for a small dresser to go in the corner. This is version two as the first one, once opened, looked like it had been hit repeatedly with a hammer!


It is in a position in the kitchen where something was needed but what exactly! We found this by accident in Truro after having looked in many other places. It is pure white and has a rose design at the top which sort of goes with the rose tiles over the cooker hob.

There is storage underneath which frees up the other cupboards a bit. When we finished ti kitchen and unpacked all the stuff we did have a bit of a clear out and passed on some items to a friend who has just bought their first house and money is a bit tight. So I have much less in my kitchen anyway.

So, now the kitchen is officially finished!!! Yay!!
Many thanks for all the lovely comments about my Sew Hip article. Glad that the project has been so positively recieved.
xx

Tuesday, 9 February 2010

Kitchen Update - The final instalment...

Our kitchen is mainly white and to avoid a clinical look we looked around and the colour red started to creep into the conversation. We have been delighted with our oven and the other day we had it all on to cook dinner, bread rolls etc and it must have been cheaper in the long run as before I would have had to have had the oven on for longer to get it all done. The items such as buns have turned out better and I am convinced the last oven was not right because I could always get good results before we moved to our present house.
So, getting back to the question of a bit of colour in the kitchen. We did not want a steel oven back splash as it looks a little cold and we did see some tiles that we liked but were not sure if it was too much.
After much thought and the knowledge that we could take them back if we changed our minds we decided on these................

As usual the picture maybe does not do them justice, but we found them in B&Q for about £6.99 each. Better value than the alternative in a specialist tile shop and perhaps not as nice. I am not a floral person when it comes to walls but it is a feature and it does seems to work. The other tiles by the sink etc will be plain white, so this is our feature wall.

Our old kitchen had this awful corner carousel thing and it was a pain to keep clean, would not rotate properly and it went so far back that I was convinced that whilst reaching in for a saucepan I would one day find myself in Narnia! So the above IKEA version was a must have and it went together sooooo easily. Light-weight but strong, it pulls out so I can reach everything and the way it is made makes it much easier to keep clean. A winner with us.

We decided to swap cupboards for their extra deep drawers ans it is actually easier to see everything and helps you to keep them tidier. So three of them were fitted in this section of the kitchen. Again, very easy to put together. No messy glue, dowels etc.

The corner area under the sink is always a tricky area so this time we bought some of IKEA's recycling buckets, which are quite tall but slender to pop round to the right but can be easily got to for things that are needed but not used every day. Then directly in the cupboard we decided on their black recycling bucket and two level grey one for every day items and the cat food etc on the second level. So far this has worked very well and stops things increasing and getting out of hand. I had to be quite ruthless when putting the kitchen back together and during the building session it is surprising just how little you do actually need to get by each day. A friend of mine has just bought her own house and we are passing any good unwanted items onto her.

At the moment we have a half size dishwasher (pre-sophie stage) and one day it will need changing. So with this in mind we have planned in for this. So at present that extra space is being filled with these little cubby holes. It has been fitted but can be removed if needed. Once, IKEA used to sell drawers to go into the gaps but sadly they do not do them any more to fit. Luckily these fabric boxes did fit, I could have made some otherwise. So we have one each plus one for bill, scissors, paper etc.

Before - central


Central - after.

Before - left-

After - left.


Before - right


After- right.

Just the white titling and switches to do in the next couple of weeks then it will have taken about 6 months to transform our kitchen

Hubby was the sole builder of this kitchen, what do you think?

xx

Monday, 18 January 2010

Kitchen Re-vamp 2

After the Friday evening fiasco with the floor, things got much better. On Sunday Hubby was up fairly early and cutting the holes for the sinks and tap attachment were the tasks for the day. Now, this wood is very thick and just cutting a straight line was very hard going and a couple of blades broke. So trying to cut neat accurate holes could be tricky. The unit was put back in the corner of the kitchen now that the floor had dried out and screwed to the wall. The dishwasher moved closer to the sink space and a gap left for the washing machine (sorry - yet to be bought new washing machine).Hubby and I then needed to carry the counter top from the garage, across the patio,spin round and get through the patio doors. Sounds easy but this counter is b****y heavy and of course I had the end which needed to swing round didn't I ? I also had to avoid tripping over the washing machine cables (machine is now out on patio awaiting its fate), various tools etc. Struggle through the door then negotiated the dishwasher and slide in on top of another cupboard which promptly fell over! Once we got it onto the other cupboards and picked up the other little cupboard circles were drawn on the wood for the sinks, and then ....that's right, back out the patio door again so that it could be cut on the black and decker workmate. (I feel a comedy sketch coming on here.)
I decided to leave hubby with his trusty little assistant to do some school work until I was needed for lifting again. The picture above shows the lovely round holes cutting using a jig saw. I did need to go back and help as the counter kept sliding whilst it was being cut, I got covered in saw dust as the wind was blowing my direction. The hole for the tap was next and a circle cutter was used for this.

Just a little bit of chiseling to make sure that the join in the circle was smooth. I have to say that Hubby did a great job cutting those circles first time with no swearing needed at all.

Then....yet again, back in through the patio door with the counter, I got the lighter this time end due to the holes being cut out but lost my grip and squashed my finger; and then it was ready to try the sinks. Ta Daaa!! Perfect fit. The funny grey contraption under the counter will join the sinks to the drain and water supply etc.

Here we have taken a step back. Flooring has been replaced where needed. Dish washer moved along, the gap for the washing machine then the little cupboard which toppled over earlier.
It started getting dark after this picture and we have moved on a little further with it all. The plumber is coming back tomorrow to plumb it all back in. He is squeezing us in because he felt so sorry for Hubby having to undo all his work otherwise it could be another week. You do not realise how much you use your sink until it is not there. Not sure when we will get a new washing machine, yet another unforeseen expense! However, next time I shall show you some of the other bits of the kitchen including the oven, which may be of interest if you are thinking of changing the one you have in the future.

I amongst all of the excitement I did manage to do my 20 mins of crafting on Sunday with these....I have decided to call it a day with my Knitted blanket! Long time regular readers will be familiar with my tales of woe over this blanket. I have knitted the last square as frankly I have had enough of it. With the left over wool I am decorating some of the squares with crochet flowers. Simple versions.

They have got looped petals and my next 20 mins today was to make three more. So I have about 10 so far. I am having to stay at work until 9pm tomorrow so I am not sure if I shall get my 20 mins in or not. So after moving a few photos around files for work tomorrow I may just have another 20 mins and sew a few of these onto the blanket.

P.S Hubby is taking a break from the kitchen tonight!

Take care

xx

Saturday, 16 January 2010

Kitchen Re-vamp 1


Beginning of September 2009
We have lived in our house for about 11 years and the kitchen was never my favourite, but when we bought it it was fine. But recently things have begun to fall apart. The first thing to go was the built-in fridge-freezer, which decided to defrost itself and we saw this just as we were about to leave very early to travel to my parents near Cambridge. We then decided to take out the whole cupboard area, which is where the microwave is and just have a larder fridge instead. There is a small chest freezer in the garage anyway. So tentative plans to sort the kitchen out began, but were left. Then the grill went in the oven! Then the oven literally went bang one afternoon so we ended up borrowing an on the counter one. Surprising what dinners you can cook without a grill or big oven! Then the lino got a lovely cut in it when we had to move one of the units to sort out another problem....and so on. So, last August, just before I went back to school, yes great timing, we started to take out the kitchen.

This is the other side. Behind me is the dining table.
Next to the window is the patio doors.

We are not quite half-way through here and the best bit was a little after this picture when we chipped off the tiles. Very therapeutic and a great stress reliever!
End of September/ Beginning of October 2009.
We have had to fit this in around work, school, ballet, pay packets etc so progress was delayed for a week or two. Going to the tip was the biggest thing as driving there and back cuts down on your actual demolition time. With the kitchen we did take it apart carefully and put it in a container and advertised it as some bits would have been good for a smaller kitchen or form spares, but no one interested so another weekend was spent moving it again but never mind.

There were some gaps in the tiling on the floor under the cupboards so we added some to level it out. Everyday stuff like washing had to still be done and you can see the little white oven that we ended up using for nearly 4 months.


This is the other side and I can really only describe this as like camping! You can see my bread making on the seating bit. Now I had bread making in the living room, upstairs in our bedroom, basically anywhere where there was a socket and no dust being created. We were like this until the beginning of November. We planned our IKEA kitchen on their website but one weekend that we were going to go the weather was really bad and then my In-laws were away because we did not want to have to take Sophie all the way to Bristol kitchen hunting. Eventually a suitable weekend came along and we went up after work on a Friday. nipped into IKEA and grabbed some catalogues then went back in on the Saturday and sorted it out in one go.

It was delivered at the beginning of December and we had a couple of weeks to try and put as much of it in as possible before Christmas. The delivery was on time,they took everything off the lorry carefully and were very friendly. Then the job of fitting everything. My Hubby had great fun as everything fitted together so well. We really would recommend IKEA and even though it is a 2hour drive there and back for us it was definitely worth it.

Not too many boxes considering. You can see my weekly shop ended up in plastic boxes, could not find a thing most of the time.


The very first thing to be installed is this lovely oven. When we visited my sister-in-law she had just got one similar to this and by the end of the week we were smitten. After doing some number crunching and agreeing it was an investment, we took the plunge.

Drilling the hole through the wall to the outside for the extractor hood was so bad it could have shaken your fillings out of your teeth. A veeerrryyy long afternoon that one but Hubby fitted it all by himself and I do not think we annoyed the neighbours too much, well we tried not to. You can see the cupboards starting to be fitted and we had to shuffle things around the kitchen and in and out of the living room constantly. The poor old cat never knew where his bowls were going to be from one meal to the next!

We have actually moved on a bit from this picture until last night when we had to take up 1/4 of the flooring and one cupboard where the washing machine was. See previous post. I shall be back with an update and more pictures. Hubby has just been up stairs to say it all seems to be going back together ok so far, so please everyone fingers crossed!!!!

Take care

xx

Friday, 15 January 2010

Kitchen Blues...

I came home tonight to hear that the washing machine is broken! The plumber says that it can not be fixed. (he was here to help plumb in our new sink) It has leaked all over our new oak flooring. It has warped the wooden panels and my hubby is having to take up the floor to see what can be salvage, what needs replacing and what can be moved.
I shall blog about our kitchen this weekend as it has been an on-going project for us.
So, it is ok if I jump up and down waving my arms like a mad women, stamping my feet, swearing very loudly and wailing like a banshee in the confines of my living room!!
So I am now off to give my husband some moral support as he spends his Friday evening taking apart all of his hard work. As I type this I am hearing "Oh no" quite a bit so things are not going well. Thank goodness we are having dinner at my in-laws tomorrow as my beloved new cooker is now in the middle of the room!
See you tomorrow.
Related Posts Plugin for WordPress, Blogger...