Showing posts with label Recycling. Show all posts

Sunday, 25 January 2015

OPAM 2015

I have signed up for OPAM 2015 and I think this is my fourth year of being involved.  The idea is that you try and finish those UFOs lying around, maintain some motivation (that is my aim) and just being involved with a project.  I try to complete at least one item a month and some months I manage quite a bit more than that.
I was not very good at actually posting what I made on a regular basis in 2014 and this year I will try and do better on that score.  I used to do a round up at the end of the month, but I no longer use Picassa as I did  use their collage option which enabled me to put lots of pictures together otherwise the posts can be longer than anyone want to read.
Anyway,
I have decided to start logging my finishes straight away otherwise I shall forget or lose the pictures.
First up is a scarf made using some frilly wool.  Sophie was given a set of needles and this wool for Christmas and she made a start on it.  Then she injured her hand and asked if I could finish it for her.  She had only knitted three rows so I think this still counts.  
She loves it and has worn it to school.
Next up is...............
...some shoes bags which I have made before.  I have used a pair of  old cotton PJ bottoms to make them.  I cut off the bottom half of the leg and stitch along that cut line.  Turn the leg/bag the other way up and put drawstring through what had been the hem of the trousers. 

 There is a natural slot to put the ribbon or piping cord through using a safety pin.
I made two to use on holiday last August and never got around to making these.  Sophie now wants some so I shall have to see what I have in my recycling box which is a small selection of clothes which might not be suitable for the charity bag but could be Recycled in some other way even if it is only as dusters or car cleaning cloths.
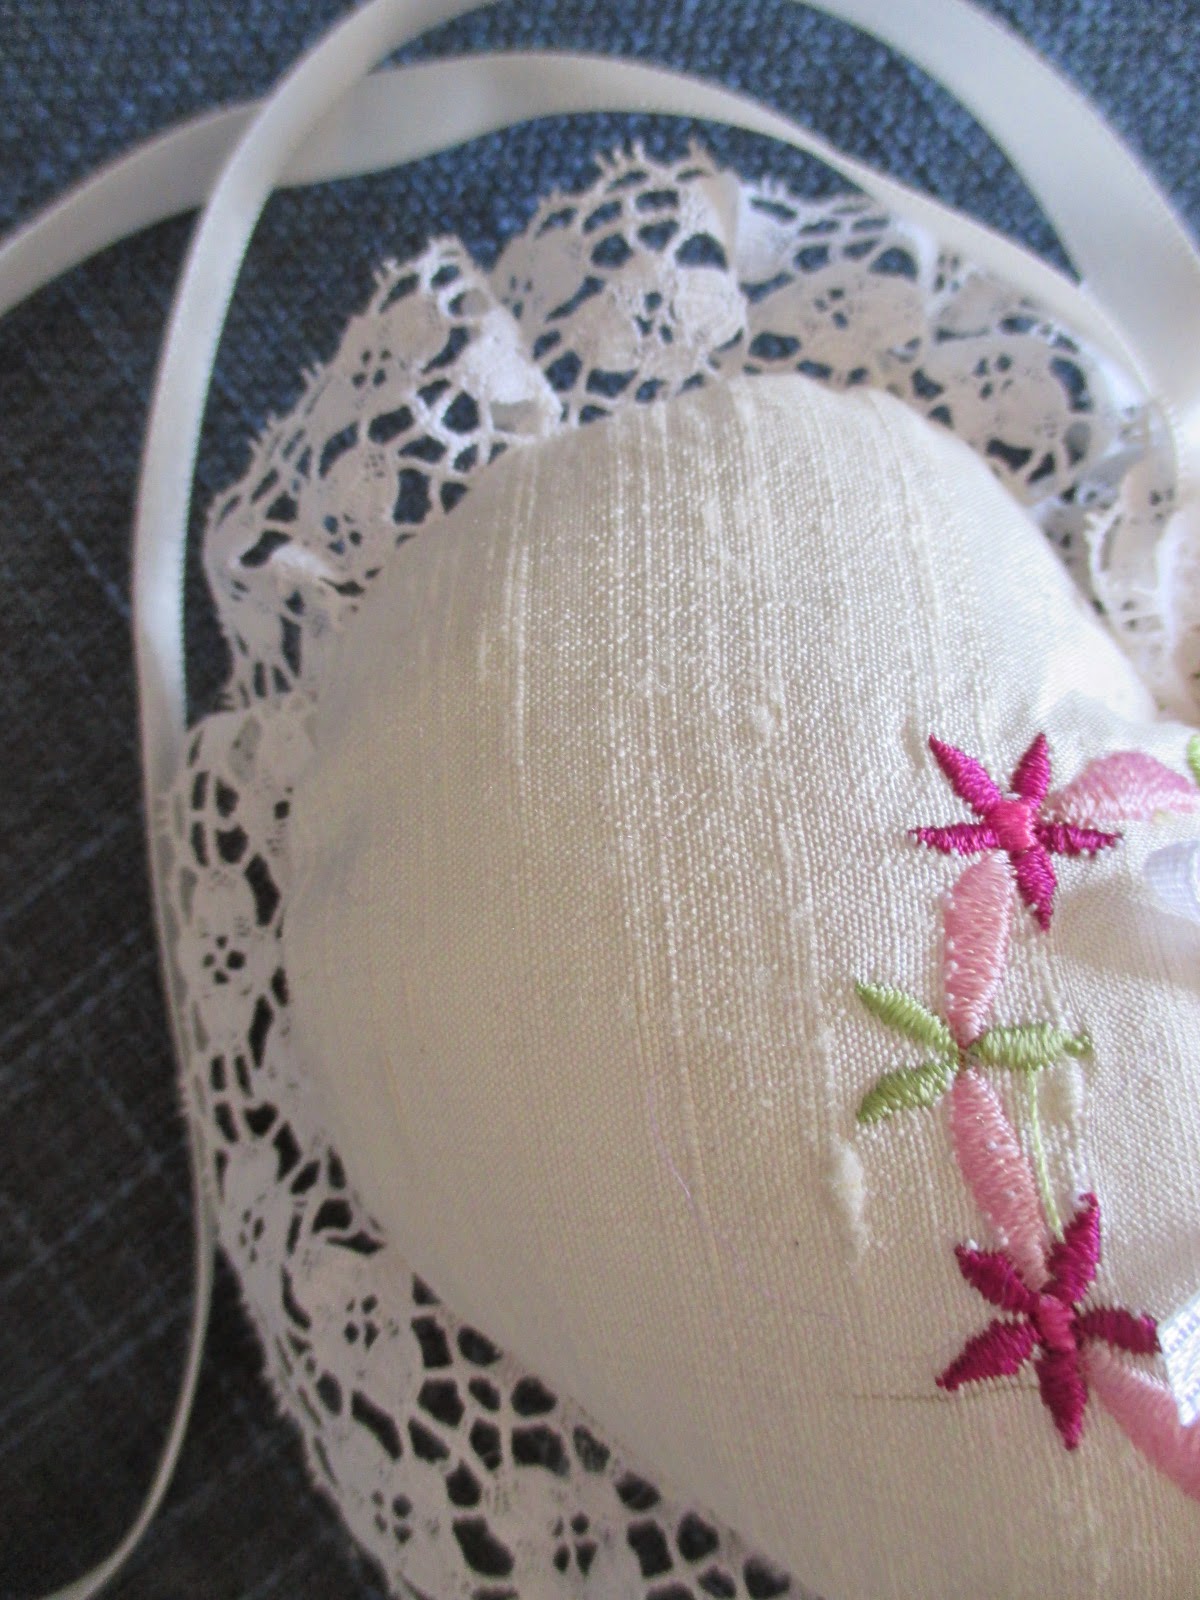
Finally, and I can only give a little peek of this finish as the recipient has not received it yet, is my entry for the 2015 Initial Heart swap.
This months makes so far seem to be rather pinky looking, I think ?
I have made progress on my crochet blanket, firstly by unpicking everything! - changing the hook size then making them all up again but it does look better.
Need to do some work for the day job then I am going to see what time it is and maybe do a little more crochet, after the vacuuming of course!
Happy Sunday to all.
xx

Sunday, 1 June 2014

Sew Along Party Update.

Well it has been a busy weekend and I have managed to do some of what I planned.
I made my shoe bags by cutting off both trouser legs as shown above.
I decided to use the hems of the trousers to create a ready-made drawstring channel by opening up the seam slightly and I also top stitched around the outer edge to stop the seam from becoming undone too far.  Using a safety pin I threaded through what was in fact the trouser tie cord which I took out and recycled to make the drawstring for my shoes bags.  Waste not want not as they say.
Then,  I stitched down the inside to straighten it up a little and across the base to close up the leg.
Hey presto!  A bag whereby I managed to also include the embroidery and beading detail which had been a feature of the summer trousers.
Trousers of course have two legs, generally, so I made a second bag!
Knotted the ends together to secure the cording.
I am pleased with these and I shall be using them when I go on the school trip to Spain next month.  I have been going on about making some for years.........better late then never.  I think I may make a couple more to keep some of my shoes dust free in my wardrobe as well.
I also went through the dresses that the Textiles Club are making as got everyone to the same stage, only had three things to do.  They are working in pairs and doing really well considering for some this is their first garment make.
So Monday tomorrow and the start of another week.
Off to bed to read my book with a cup of tea.
xx

Saturday, 31 May 2014

Chook Shed Party - I'm in.......

Chooky's Chook Shed Party
I thought, as my way of joining in with the sewing party would be too catch up on a couple of little projects as I am also in the middle of marking a big project just completed by Year 9.
So first up is a pair of lightweight trousers and the left over pair of jeans from making a bag.  These are hopefully going to be two shoes bags for when O go to Spain with a school trip and then our family holiday.  No need for plastic bags next time or that is the plan.
These jeans have some lovely detailing on them.
Next up as  bit of Textiles Club preparation for Monday as I need to check the dresses that we are making and cut enough bias binding.
I have printed the labels on to printable fabric and these need cutting up and stitching on to the pockets before being added to the dresses.
It is Saturday here in the UK so I think I have until Sunday evening for this even though the Chook Shed party will be over by then due to the time difference with Australia but if you look on Chooky's blog I think they are having too much fun to really notice a few hours here and there.
What are you all up to this weekend.
(Hubby is painting the outside of the house as it is the best half term in years for weather!)
xx

Wednesday, 16 April 2014

OPAM April - Cushion Sample

Just before the start of the Easter holidays I was given quite a few metres of good quality curtain fabric and I thought that this might be a good chance for my textiles club to have a go at making a cushion cover.  If they can bring in the cushion pad then they can make the cover to fit.
I have found with experience that it is better to have a sample to show what the material can look like.
So on Tuesday I quickly rustled up this cushion.
This picture gives you an idea of the fabric.
I used the existing cover to create the dimensions as I did use this cushion to display corsages and brooches at craft fairs.
I decided to create a simple pinwheel by using the front panel of the old cover and dividing it into 4 then adding a seam allowance all the way round which I then cut into a triangle and I measured it directly on to the fabric.  I added some cream cotton as a contrast.
I then used one of the built in stitches on my machine to add some detail and help to keep the seams flat.
 I felt that the centre of the cushion needed a little something and I do have one of these Yo Yo or Suffolk Puff makers.  I thought that some of the students could add these if they liked them.
I have made Yo Yo's without one of these for years but it does enable you to make them all the same size and it is a bit less fiddly.
Found an odd wooden button in my sewing box and stitched the whole lot in the centre of the front panel.  Hides any misalignment of the patchwork  ( which I am proud to say was not the case) and a focal point.
On the back it has a simple envelope opening and I hope that this gives the club members an idea, which they can then interpret in their own way  and at the same time can see what the material could be developed into.
Not bad for 1.5 hours of playing -  sorry I mean working!!

Wednesday, 11 January 2012

Recycled Cards

I thought that you would like to see something that Sophie and I made together at the weekend.
Old Christmas cards, hole punch, old pinking shears, thin ribbon, sentiment stickers.
For several years Sophie and I said that we should recycle our cards and make them into something, and this time we did!
We cut the cards into shapes and punched a hole.
Sophie added the stickers on the back and looped the ribbon through.
We soon had a small pile of tags ready for next Christmas.  Any cards not used were put in the recycling and the above tags have been put safely in one of the small dresser drawers where we will be able to find them.
Our organising of 2012 is still going strong.....so far.
What you do with all of your Christmas cards?
I was sent a lovely card two years ago by Lise at The Chocolate Cat with a round patchwork cushion on it and I have kept it as a bookmark as I liked it so much.
xx

Tuesday, 26 July 2011

Tie Dye T-shirt Re-Vamped

A couple of weeks ago my Textiles group tie dyed some t-shirts, tops and pillowcases that they had brought in. It was amazing how the same dye baths reacted with the different fabric contents. One of the purple tops had red streaks running through it which gave it a sort of 3D look.

The following lesson, once they had dried on coat hangers on a running rail sat on top of plastic sheeting we discussed embellishing the tops.

I like to have a go as well, white t-shirts to not seem to stay white like they used to and it enables me to demonstrate how it could be added to.

So my t-shirt is shown above, dyed in the pink bath along with everyone else's.

I like my buttons so I decided to pick some bright summery colours to decorate the neckline.The flower in the centre is a lovely shell button and I evenly spread them along the neckline and stitched the on individually.It looks a little like a necklace.

Some of the students added sequins and ribbon too. Sorry no pictures as they were so keen to take them home that I could not really say no just so that I could take some photos. Never put off enthusiasm!

I have often tie dyed t-shirts for Sophie, especially when she was younger, just popped a top in from ASDA along with the students work as I feel that learning is also by doing the task yourself as well.

Actually wearing the final outcome is even better, but the B

British weather had other ideas, but come next term and a fine day I shall be wearing this to work!

You can easily tie dye at home and it does not need to be messy or cost a lot of money. It can rejuvenate a white or light coloured top which may have a pale stain on it. There is a limit to what the dye can cover but my husband managed to dye a top black which had been discoloured with motor oil.

We just make sure that it is washed on its own. If the weather is nice tie dyeing is a good to do outside. I would like to dye some pink pillowcases for Sophie next time. She is still very much into her pink.

xx

Friday, 24 June 2011

Fabric Monster Update

Well, it has been one tiring week but it is now finally the weekend. This is the first of several posts showing what the students have made this week.

First up is the monsters! 18 boys and one girl and they had a day to design and make a fun monster. Sounds easy eh?

Above is a group picture.

We started off by watching a bit of Monsters Inc while I went off and started the GcSE Textiles exam. They were asked to sketch some ideas whilst watching it. Then my TA and I had to guide them in re=creating these ideas. Crikey, what were we thinking of!

The colour yellow seemed very popular with many of the students.

I think that you can spot the one made by the only girl in the group. I bought some fur but not many went for it. Preferring to stick with fleece, probably for the best in the end. There is more "give" in it so it is easier to get all of the sections to fit.
This young lady is very talented and has ideas that she can actually follow through without someone else having to do it for her. She had her idea cut, pinned and stitch way before the rest. She then went on to make a mini version in a front pocket!

Each student was given a green ticket. On the front they gave their monster a name. This caused a bit of a stir. There was Mr Fuzzy, Francis, Zip and Spot to name but a few.

This was made by a lad who I have taught for three years and this year everything seems to have fallen into place. He understands what he is doing, is on the ball and is enjoying what he is doing. He used the word "proud all day". This was the main reason for doing the job that I do. It is well made and the bright orange nose makes me laugh.

I think that this fine example best represents how I feel at the moment. I just love the expression on its face!

This creature was made by a student who had not signed up originally for this workshop, but was keen to turn his drawing into a 3D fun monster.

By the end of the day the two of us were exhausted but we had a great group of monsters made by a group of teenage lads who were keen to work solidly all day and who wanted to take their work home, so I had a job hanging on to them to take pictures and put them on display for a week.

What do you think of them? There are loads of ideas on this theme on google images, books on Amazon and lots of tutorials and patterns on the Internet. It was good fun and the day went so quickly too.

Tomorrow we shall take a look at gadget cases.

Hubby is away this weekend so I have the ballet run to do so I shall say good night.
xx

Tuesday, 21 June 2011

Monster Mash - Meet Cardy

For the past few weeks I have been planning and making samples for three workshops that I am running at school this week. One of the workshops is to make Monsters. Ideally we would use recycled items but the number of students involved I would have to buy out a complete charity shop! So we shall recycle what we can and use fleece, felt etc where needed.

So this weekend I finished the above Monster, meet Cardy my new monster friend.
He was made using this cardigan. I felted it and to give you an idea of how much it felted I used to wear this when I was pregnant with Sophie! Just two hot washes is all it took. The sequins survived and so did the buttons.
I saved the buttons in my button tin for another day.
Sequins. It was lovely to cut and the felting gave it a firmness to create something strong
, a bag would have worked well. However, I needed a monster!
I used fur for the areas that you can see in white, a felt mouth and a "tooth" like button. Some more felt for the eyes. I cut the main body of the cardigan for his legs and the monster's body and the sleeves became his arms. I was pleased to get the stripes on his legs and arms.

He did not take very long to make, about 2 hours but I was not rushing.

Toffy seems to like him as well.
I hope to have some pictures of the student Monsters to show you tomorrow, if I have not collapsed in an exhausted heap!
xx
OPAM 2011 finish for June

Saturday, 4 June 2011

Up-cycled Beaded Bracelet- Simple Tutorial

If any jewellery or other accessories break I do try and save whatever I can and visiting a little shop in Truro gave me an idea to recycle some beads which I have had hidden in my bead box for ages and ages. I needed the above which a re miniature in size.
On the right is quite a long length of chain which I could cut and add fastenings on using the pliers above. Cost about £2.49 for quite a long length. I did not think to measure it, opps. I also had some rings which I had bought ages ago but could not find the chain at the time. It is always the way, is it not?

These beads are quite large as they were once attached to an elasticated crochet style scrunchie. I like purple (I wear purple glasses) and I also wore this whilst I was pregnant with Sophie so I did not want to throw them out. I always had a mind to make a bracelet or something that I could wear.


After laying them out on the table to decide on the colour order I carefully added them to the chain using the rings. I used the little round nosed pliers to ease open the rings just wide enough to get the beads on. Then used the flat edge pliers to closed it up again. I recycled the catch from a broken necklace and added a larger catch ring so that it is easier to do up with one hand.


Nice stylish close up pic!


I was really pleased with how this turned out because sometimes an idea is better in your head than it is once it has been made. Luckily this looks good made up as well.


I have worn it several times this week and it has been commented on more than some of my posher bracelets. Confirms my belief that I should not throw anything away if I think I can find a use for it. I even have enough left over to make a pair of earrings. Just need to get the earring bit to make them up.


Give this a go with any beads that you have. As long as the rings will go through the beads and the chain you are off and away. You could even attach them using small nail scissors rather than shell out for pliers.


It has been a glorious day here in Cornwall, tomorrow I think rain is on the hrizon but the garden sure does need it.


xx

Related Posts Plugin for WordPress, Blogger...