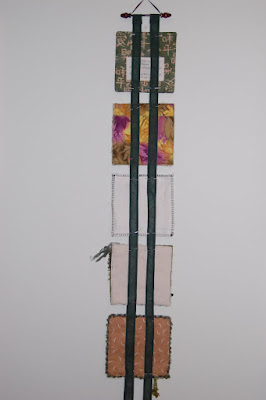
I have been planning and working out how I could present and make the best of the quilities sent to me plus the extra one of my own that I made. I have had these lying around for years instead of months with the 'they will be useful one day' That day had arrived yesterday!
They are not very long, I think they came with a miniature cross stitch kit from the front of a magazine.

It did get me thinking about using them to hang the Forest Quilties. Now, the quilties do have writing on the back and I do not want to add or interfere with the appearance of the quilties designed. I then found some long lengths of green bias binding and then an idea began to form..
 Using green thread I stitched down both sides to hold down the edges and to prevent the binding from stretching. I then stitched loops to go over the top hanging rod.
 The ends of the hangers come off which makes this easy, to add a ribbon I just clamped the ribbon on the end and then put the end stopper on again. (Hope that makes sense!)
 I decided that the easiest way would be to hang up the lengths of binding and gradually add the squares. So at the moment it is all back to front and I am carefully pinning the squares to the binding. Keeping a gap between each one. I intend to just put a few stitches top and bottom to hold them in place.
 The idea being that any writing/inscriptions on the back can still be read. The binding is to simply support the Quilties, nothing else.
 Back view.

Just to finish it off I put the other hanger on the bottom. If needed something could a added to this to act s a weight to help keep it straight.
 Here is the final arrangement: Starting at the top:
Sharon Walworth
Fiona
Mine
Cheri Hins
Beverley Teichrob
Below are some close ups pictures of the final layout. I am pleased with the outcome and I hope that it has been sympathetic to the theme of the original swap.

It is was going to go on the spiral stairs up to the attic but my hubby likes it so much that it is in the living room!
Another 'to do' item done.
What do you think?


%5B1%5D.jpg)


%5B1%5D.jpg)


%5B1%5D.jpg)


17 comments:
What a great wall hanging idea! What is the size of the little quilties? I love it!
Sarah Doyle
http://PatternsThatFitYou.com
http://SewingBusiness.com (Blog)
Very clever display, I love it!
So... is this to do list you are checking off project from a new years resolution? I almost announce that was one of mine too when I announce about my doing one thing a month for charity, but I focused on the later and kept my other one to my self, I just finished my "froot loops" socks [about 5 minutes ago] from an issue of Knitty from last year, I think it was a spring issue, anyway, it's been awhile since I started them, I know I stopped working on them when it got too hot to wear hand knit socks!
Andrea that is just amazing. I absolutely love that idea. They go so perfectly together. I like the 'hanging rods' they're perfect for the job.
They look brilliant. What a great idea - you must be thrilled with how it turned out. x
What a clever idea - i'm not surprised it has ended up in your living room!
x x x
very clever and very pretty. well done you. By the way my latest bag is for an old Uni friend who i will be seeing in London tomorrow
what a brilliant idea, and they look great!
xx
Looks fantastic! What a great way to hang them.
I love it! Such a clever and inventive idea. Perfect.
I agree, a great way to enjoy the quilties. I have some similar metal hangers that I was going to attach one quilt to but this is a much better idea.
Super! See why I love this bloggythings because it's full of 'smart' ideas and the result awesome like yours, Andrea.
Now. I go to make a clear print of this hanging to file. One day in the future I'm gonna give it a try:)
Have a hopeful friday~
What a great idea! You are so talented. I love it!
Great isea, they look Fab!
Vicky x
looks great, what a fab way of displaying them
Twiggy x
What a great idea! Those quilties are wonderful.
what a great idea! I love it!
Missy
Great instructions! And the finished hanging is so nice. Thanks for sharing.
Post a Comment